Deploying Production Ready Application with HTTPS on Kubernetes using GitHub Action, ArgoCD & CloudNativePG
Introduction
Hello everyone! Today, we’ll learn how to securely deploy a Python application on Kubernetes with HTTPS, using GitHub Actions and Argo CD. Our application, built with Flask, offers users a stylish HTML interface to manage their goals.
In this guide, we’ll cover SSL certificate configuration, setting up a PostgreSQL database with CloudNativePG for Kubernetes, and achieving scalability through Horizontal Pod Autoscaling. By integrating GitHub Actions and Argo CD, you can automate CI/CD for a dependable setup that handles real-world demands effectively. Let’s begin this exciting journey!

Here’s a step-by-step guide to help you set up this workflow:
- GitHub Repository Setup:
Create a new repository or use an existing one to host your application code.
Ensure your Kubernetes manifests (deployment files, service files, etc.) are version-controlled in the repository.
2. Configure and Install Argo CD:
Set up a Kubernetes cluster where you want to deploy your application.
Install and configure Argo CD in your Kubernetes cluster. You can follow the official Argo CD documentation for installation instructions.
3. Configure GitHub Actions for CI:
Create a .github/workflows directory in your repository.
Create a CI workflow file (e.g., build-push-image.yaml) inside the .github/workflows directory.
Configure the workflow to build and test your application code. You can use the appropriate actions, such as building Docker images.
Commit and push the workflow file to your repository.
4. Configure your Application for Argo CD:
Create an Argo CD application manifest file (e.g., deploy.yaml) in your repository’s directory.
Commit and push the deploy.yaml file to your repository.
5. Configure GitHub Actions for CD:
It will updated the deploy file (e.g., deploy.yaml) in app/deploy/ directory.
This will automatically deploy your application to the Kubernetes cluster specified in the Argo CD configuration.
6. Enable GitHub Actions:
Go to your GitHub repository’s “Actions” tab.
Enable GitHub Actions if not already enabled.
GitHub Actions will now automatically trigger the CI workflow whenever changes are pushed to the repository. On successful completion of the CI workflow, the CD workflow will be triggered.
Pre-requisites
AKS Kubernetes Cluster
Azure Student subscriptions have a limitation of only three public IP addresses per region. This means that you can only have up to three public IP addresses allocated to resources (such as virtual machines, load balancers, etc.)
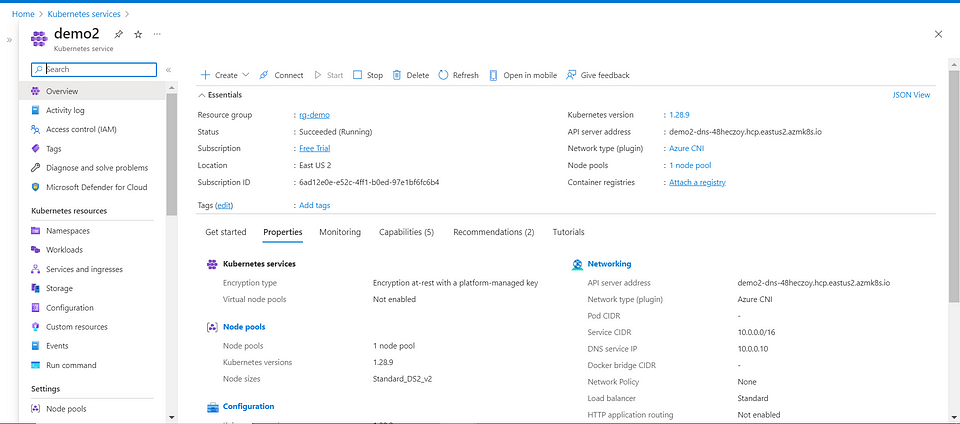
Dependencies need to be installed before deploying an application on a Kubernetes cluster
CloudNativePG is an open source operator designed to manage PostgreSQL workloads on any supported Kubernetes cluster running in private, public, hybrid, or multi-cloud environments. CloudNativePG adheres to DevOps principles and concepts such as declarative configuration and immutable infrastructure.
Install Cloudnative PG :
kubectl apply --server-side -f \
  https://raw.githubusercontent.com/cloudnative-pg/cloudnative-pg/release-1.23/releases/cnpg-1.23.1.yaml
Create postgres-cluster.yml
apiVersion: postgresql.cnpg.io/v1
kind: Cluster
metadata:
  name: my-postgresql
  namespace: default
spec:
  instances: 3
  storage:
    size: 1Gi
  bootstrap:
    initdb:
      database: goals_database
      owner: goals_user
      secret:
        name: my-postgresql-credentials
Create Database cluster
kubectl apply -f postgres-cluster.yaml
Create secret
kubectl create secret generic my-postgresql-credentials --from-literal=password='new_password' --from-literal=username='goals_user' --dry-run=client -o yaml | kubectl apply -f -
It will create 3 instance of postgresql database and uses the secret my-postgresql-credentials
Exec into pod to create table
kubectl exec -it my-postgresql-1 -- psql -.U postgres -c "ALTER USER goals_user WITH PASSWORD 'new_password';"
kubectl port-forward my-postgresql-1 5432:5432
#open new termainal after forwarding the port
#then excute below command creating db table.

PGPASSWORD='new_password' psql -h 127.0.0.1 -U goals_user -d goals_database -c "

CREATE TABLE goals (
    id SERIAL PRIMARY KEY,
    goal_name VARCHAR(255) NOT NULL
);
"

Install CERT MANAGER
kubectl apply -f https://github.com/cert-manager/cert-manager/releases/download/v1.14.5/cert-manager.yaml
Install nginx ingress controller
kubectl apply -f https://raw.githubusercontent.com/kubernetes/ingress-nginx/controller-v1.9.4/deploy/static/provider/cloud/deploy.yaml
Install Metrics server
kubectl apply -f https://github.com/kubernetes-sigs/metrics-server/releases/latest/download/components.yaml
Prerequisites Building Application on GitHub Action
Create .github/workflows folderCreate a file build-push-image.yamlCreate a jinja template app/tmpl/deploy.j2Create deployment file — /app/deploy/deploy.yamlCreate GitHub Actions secret — DOCKERHUB_USERNAME and DOCKERHUB_PASSWORDMake sure your GitHub actions have push access.

Prerequisites Deploying Application on Argo CD
Install ArgoCD server on KubernetesLogin with Admin & Password
Installing ArgoCD in Kubernetes Cluster
kubectl create namespace argocd
kubectl apply -n argocd -f https://raw.githubusercontent.com/argoproj/argo-cd/stable/manifests/install.yaml
kubectl patch svc argocd-server -n argocd -p '{"spec": {"type": "LoadBalancer"}}'
kubectl get secret -n argocd argocd-initial-admin-secret -oyaml
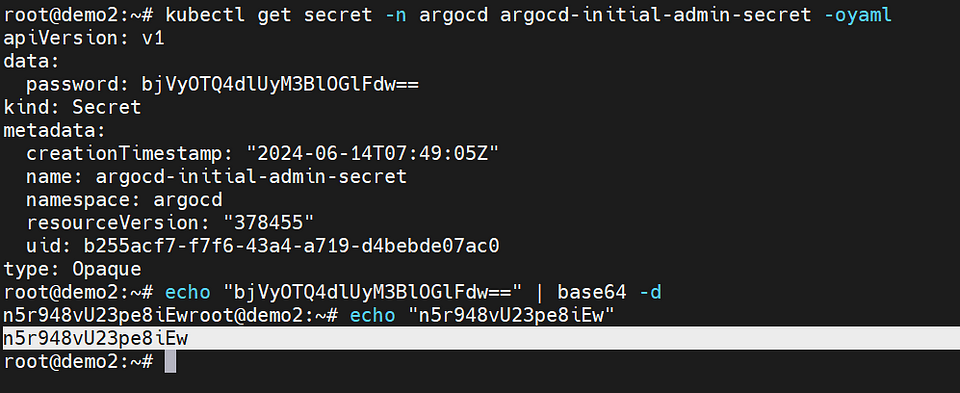
After getting argocd-initial-admin-secret convert into base64 same will be use for login.
Deployment step-by-step for CI-CD through GitHub action & Argo CD
Once you have cloned the application from the GitHub repository, you need to make some updates to the files based on your Docker Hub registry and the details of your external load balancer (IP address or domain). These updates are made in the deploy.js file, which utilizes a Jinja template during runtime.
Here’s a simplified explanation:
Clone the application: Download the application’s source code from the provided GitHub link to your local machine.
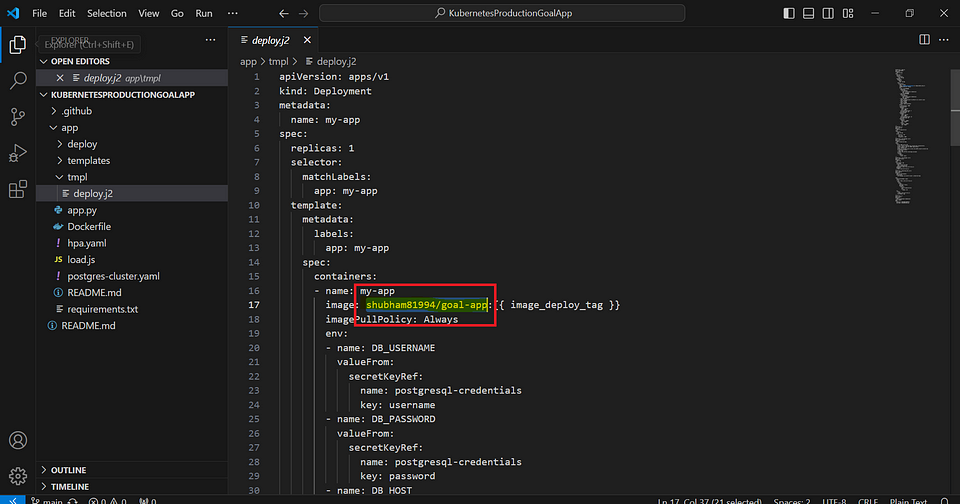
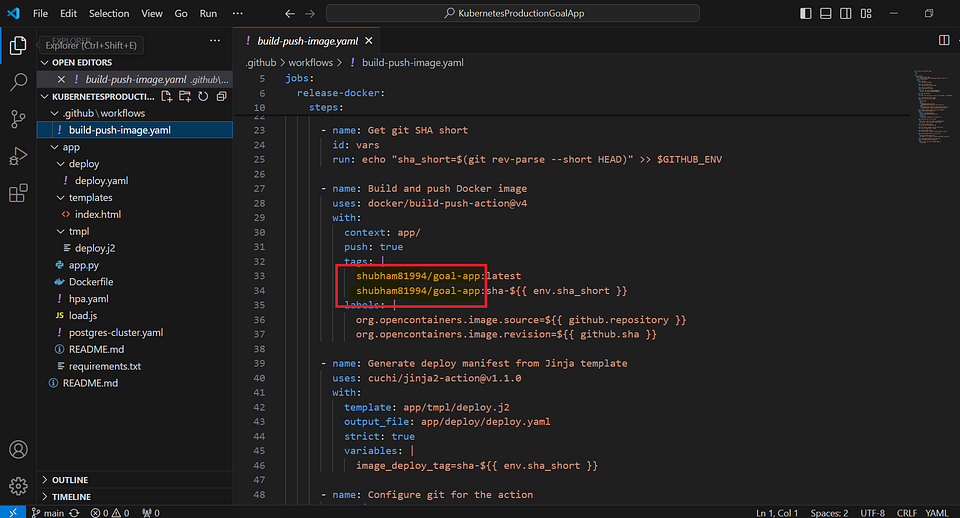
Update Docker Hub registry details: Modify the deploy.js file & github/workflows/build-push-image.yaml to replace the Your Docker Hub registry details. This means changing the Docker image references in the file to point to your own Docker Hub registry where the application’s images are stored.
Update load balancer details: In the deploy.js file, update the IP address or domain information of your external load balancer. This ensures that the application communicates with the correct load balancer for routing incoming traffic.
Jinja template usage: The deploy.js file utilizes a Jinja template during runtime. Make sure that the Jinja template is configured correctly in the deploy.js file, allowing it to generate the required content based on the provided inputs.
By completing these steps, you ensure that the cloned application is configured to use the appropriate Docker images from your Docker Hub registry and interacts with the correct external load balancer based on the provided IP address or domain details.
Overview of the Application
The application built with Flask offers a user-friendly interface for managing goals. The main components of the application are app.py, which contains the Flask server code, and index.html, which is the stylish HTML template for the user interface.
from flask import Flask, render_template, request, redirect, url_for
import psycopg2
from psycopg2 import sql, Error
import os

app = Flask(__name__)

def create_connection():
    try:
        connection = psycopg2.connect(
            user=os.getenv('DB_USERNAME'),
            password=os.getenv('DB_PASSWORD'),
            host=os.getenv('DB_HOST'),
            port=os.getenv('DB_PORT'),
            database=os.getenv('DB_NAME')

        )
        return connection
    except Error as e:
        print("Error while connecting to PostgreSQL", e)
        return None

@app.route('/', methods=['GET'])
def index():
    connection = create_connection()
    if connection:
        cursor = connection.cursor()
        cursor.execute("SELECT * FROM goals")
        goals = cursor.fetchall()
        cursor.close()
        connection.close()
        return render_template('index.html', goals=goals)
    else:
        return "Error connecting to the PostgreSQL database", 500

@app.route('/add_goal', methods=['POST'])
def add_goal():
    goal_name = request.form.get('goal_name')
    if goal_name:
        connection = create_connection()
        if connection:
            cursor = connection.cursor()
            cursor.execute("INSERT INTO goals (goal_name) VALUES (%s)", (goal_name,))
            connection.commit()
            cursor.close()
            connection.close()
    return redirect(url_for('index'))

@app.route('/remove_goal', methods=['POST'])
def remove_goal():
    goal_id = request.form.get('goal_id')
    if goal_id:
        connection = create_connection()
        if connection:
            cursor = connection.cursor()
            cursor.execute("DELETE FROM goals WHERE id = %s", (goal_id,))
            connection.commit()
            cursor.close()
            connection.close()
    return redirect(url_for('index'))

@app.route('/health', methods=['GET'])
def health_check():
    return "OK", 200

if __name__ == '__main__':
    app.run(host='0.0.0.0', port=8080)
Docker File : This Dockerfile is used to build a Docker image for a Flask application.
# Use an official Python runtime as a parent image
FROM python:3.9-slim

# Set the working directory in the container
WORKDIR /app

# Copy the requirements file into the container at /app
COPY requirements.txt /app/

# Install any dependencies specified in requirements.txt
RUN pip install --no-cache-dir -r requirements.txt

# Copy the rest of the application code into the container at /app
COPY . /app

# Make port 8080 available to the world outside this container
EXPOSE 8080

# Define environment variable for Flask
ENV FLASK_APP=app.py

# Run the application using Gunicorn
CMD ["gunicorn", "--bind", "0.0.0.0:8080", "app:app"]
requirements.txt
Flask
psycopg2-binary
gunicorn
Replace Docker hub registry & load balancer details.
Path: app/tmpl/deploy.j2 .github/workflows/build-push-image.yaml

Commit code into Repo (KubernetesProductionGoalApp)
Whenever there are changes in the application code specifically in the files app.py and index.html located in the app/ directory, it will trigger the build pipeline.
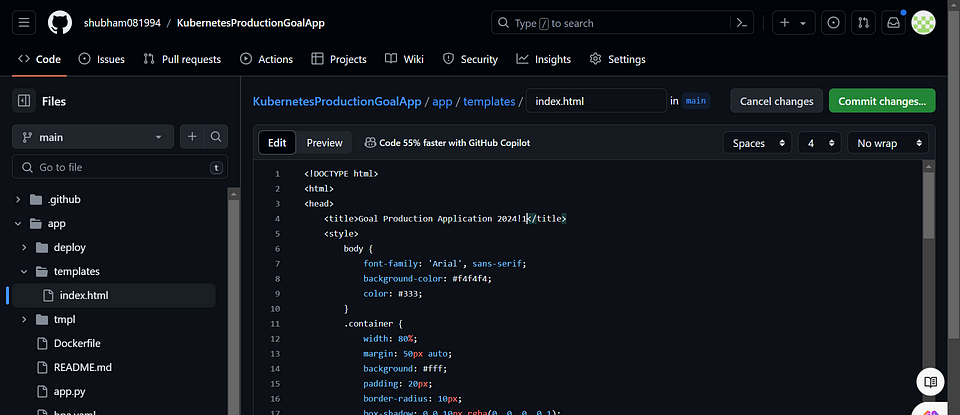
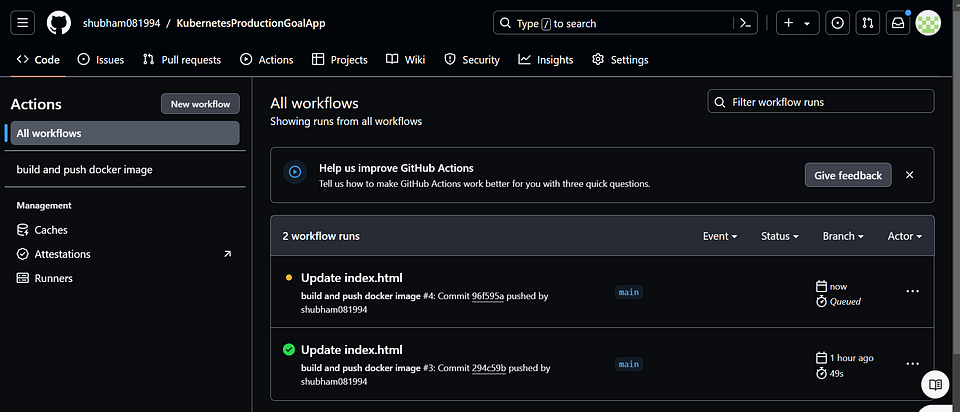
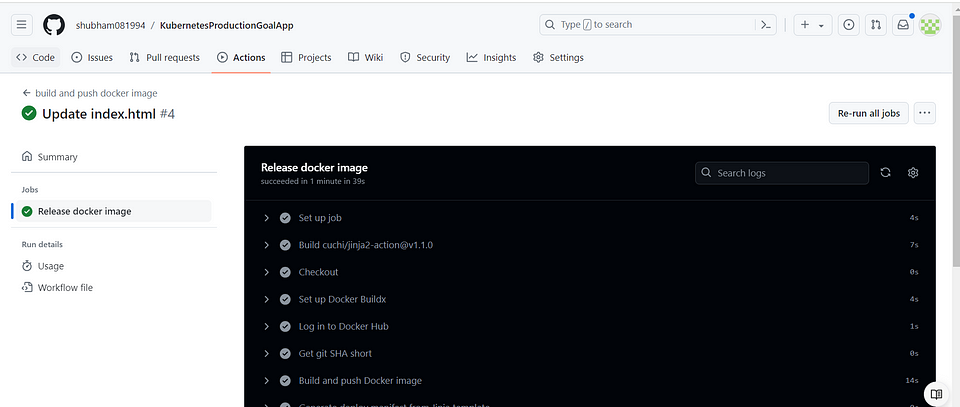
Certainly! Once the build-push-image pipeline for your application is completed, it means that the process of building the application, creating a Docker image, and pushing it to your desired registry (such as Docker Hub) has finished successfully.
Kubernetes Deployment manifest file, which is used to define how applications should be deployed and managed in a Kubernetes cluster. In this context, a Jinja template can be used to dynamically generate such manifest files, allowing for flexibility in managing configurations and ensuring consistency across deployments.
For example, in the snippet you provided, the image_deploy_tag variable can be dynamically replaced with the desired image tag during the templating process.
kubernetes deployment manifest.yml will be created inside the app/deploy/deploy.yaml its will integrated with ArgoCD. ( Whenever deployment file will update with latest image will pull through Argo CD )
The provided code is a GitHub Actions workflow that performs the following main tasks:
Builds and pushes a Docker image, specifying the build context, tags, and labels.
Generates a deployment manifest file from a Jinja template, using variables and strict mode.
Configures git settings, pulls the latest changes, applies stashed changes, commits the deployment manifest
Overall, the code automates the process of building and pushing a Docker image, generating a deployment manifest, and updating the repository with the changes inside app/deploy/deploy.yaml.
apiVersion: apps/v1
kind: Deployment
metadata:
  name: my-app
spec:
  replicas: 1
  selector:
    matchLabels:
      app: my-app
  template:
    metadata:
      labels:
        app: my-app
    spec:
      containers:
      - name: my-app
        image: shubham81994/goal-app:sha-96f595a
        imagePullPolicy: Always
        env:
        - name: DB_USERNAME
          valueFrom:
            secretKeyRef:
              name: postgresql-credentials
              key: username
        - name: DB_PASSWORD
          valueFrom:
            secretKeyRef:
              name: postgresql-credentials
              key: password
        - name: DB_HOST
          value: my-postgresql-rw.default.svc.cluster.local
        - name: DB_PORT
          value: "5432"
        - name: DB_NAME
          value: goals_database
        ports:
        - containerPort: 8080
        readinessProbe:
          httpGet:
            path: /health
            port: 8080
          initialDelaySeconds: 5
          periodSeconds: 10
        livenessProbe:
          httpGet:
            path: /health
            port: 8080
          initialDelaySeconds: 15
          periodSeconds: 20
        resources:
          requests:
            memory: "350Mi"
            cpu: "250m"
          limits:
            memory: "500Mi"
            cpu: "500m"
---
apiVersion: v1
kind: Service
metadata:
  name: my-app-service
spec:
  selector:
    app: my-app
  ports:
    - protocol: TCP
      port: 80
      targetPort: 8080
---
apiVersion: cert-manager.io/v1
kind: ClusterIssuer
metadata:
  name: production-app
spec:
  acme:
    # The ACME server URL
    server: https://acme-v02.api.letsencrypt.org/directory
    # Email address used for ACME registration
    email: demo@v1.com
    # Name of a secret used to store the ACME account private key
    privateKeySecretRef:
      name: app
    # Enable the HTTP-01 challenge provider
    solvers:
    - http01:
        ingress:
          class: nginx
---
apiVersion: cert-manager.io/v1
kind: Certificate
metadata:
  name: app
spec:
  secretName: app
  issuerRef:
    name: production-app
    kind: ClusterIssuer
  commonName: demo.4.152.16.75.nip.io
  dnsNames:
  - demo.4.152.16.75.nip.io
---
apiVersion: networking.k8s.io/v1
kind: Ingress
metadata:
  name: my-app-ingress
  annotations:
    cert-manager.io/cluster-issuer: production-app

spec:
  ingressClassName: nginx
  rules:
  - host: demo.4.152.16.75.nip.io
    http:
      paths:
      - path: /
        pathType: Prefix
        backend:
          service:
            name: my-app-service
            port:
              number: 80
  tls:
  - hosts:
    - demo.4.152.16.75.nip.io
    secretName: app
---
apiVersion: v1
kind: Secret
metadata:
  name: postgresql-credentials
type: Opaque
data:
  password: bmV3X3Bhc3N3b3Jk
  username: Z29hbHNfdXNlcg==
Included Configuration for HTTPS -
The provided code is a YAML configuration for setting up an SSL certificate using cert-manager. Here’s a simplified explanation:
- Cluster Issuer Definition:
Sets up an issuer called “production-app” to issue SSL certificates using Let’s Encrypt.
Specifies the Let’s Encrypt server URL, email address, and secret name for storing the account private key.
- Certificate Definition:
Requests an SSL certificate for the domain “demo.4.152.16.75.nip.io” using the “production-app” ClusterIssuer.
Stores the issued certificate in a secret named “app”.
Specifies the common name and DNS name for the certificate.
By applying this configuration, cert-manager will automatically handle the process of requesting and managing an SSL certificate from Let’s Encrypt for the specified domain. The certificate will be stored securely in a secret named “app” for use in securing the application
apiVersion: cert-manager.io/v1
kind: ClusterIssuer
metadata:
  name: production-app
spec:
  acme:
    # The ACME server URL
    server: https://acme-v02.api.letsencrypt.org/directory
    # Email address used for ACME registration
    email: demo@v1.com
    # Name of a secret used to store the ACME account private key
    privateKeySecretRef:
      name: app
    # Enable the HTTP-01 challenge provider
    solvers:
    - http01:
        ingress:
          class: nginx
---
apiVersion: cert-manager.io/v1
kind: Certificate
metadata:
  name: app
spec:
  secretName: app
  issuerRef:
    name: production-app
    kind: ClusterIssuer
  commonName: demo.4.152.16.75.nip.io
  dnsNames:
  - demo.4.152.16.75.nip.io
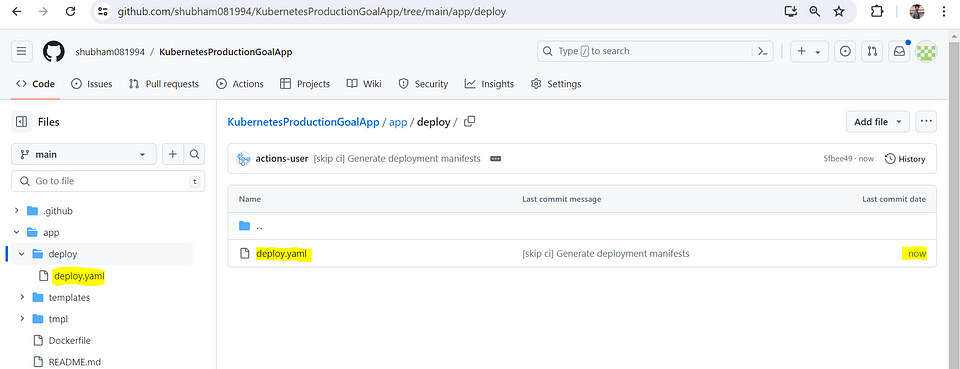

image: shubham81994/goal-app:{{ image_deploy_tag }}
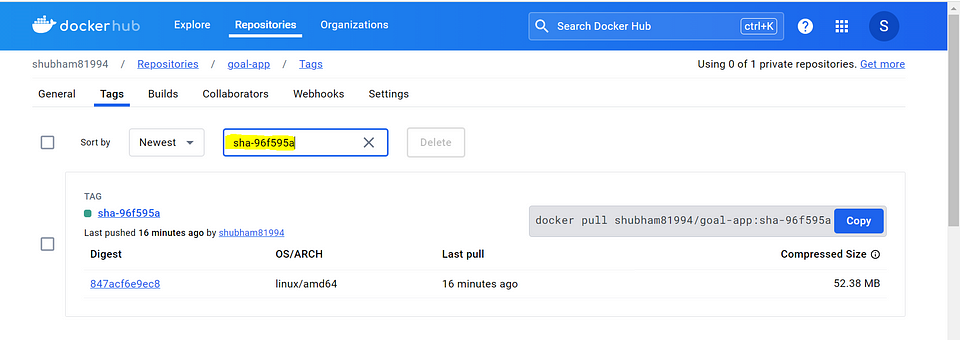
Check your docker hub registry with latest image tag details.
Deploying Production Application in ArgoCD
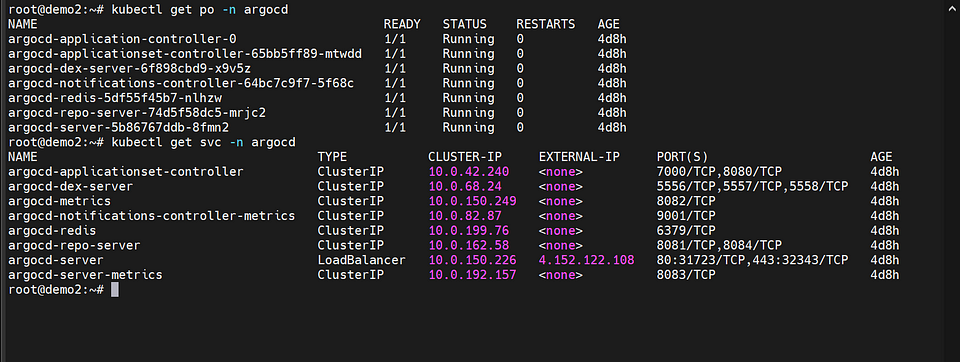
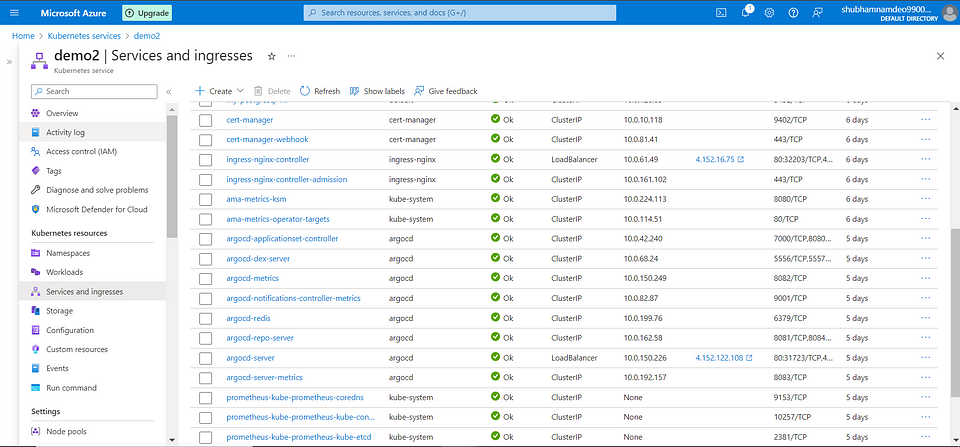
After you have installed the ArgoCD Server, you need to check the external IP address assigned to it. This IP address is used to access the ArgoCD Server. Once you have the IP address, you can use it to log in to the ArgoCD Server and start managing your deployments and applications.
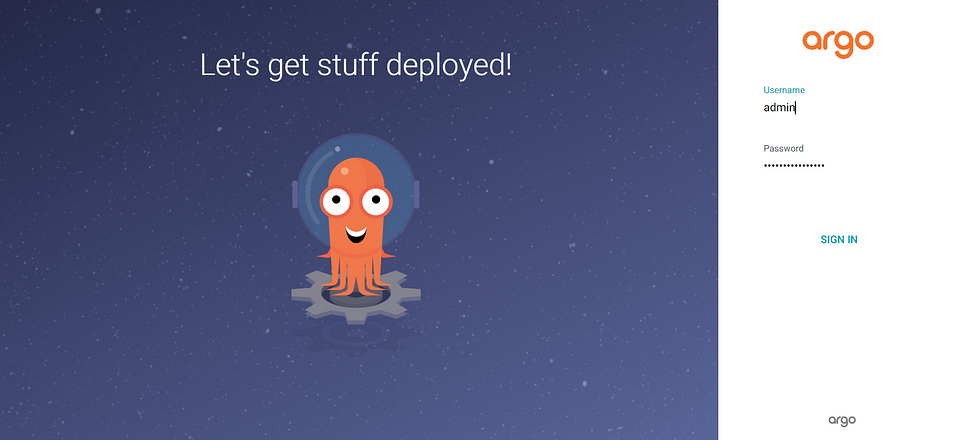
Open the https://4.152.122.108 for accessing the ArgoCD Login Page.
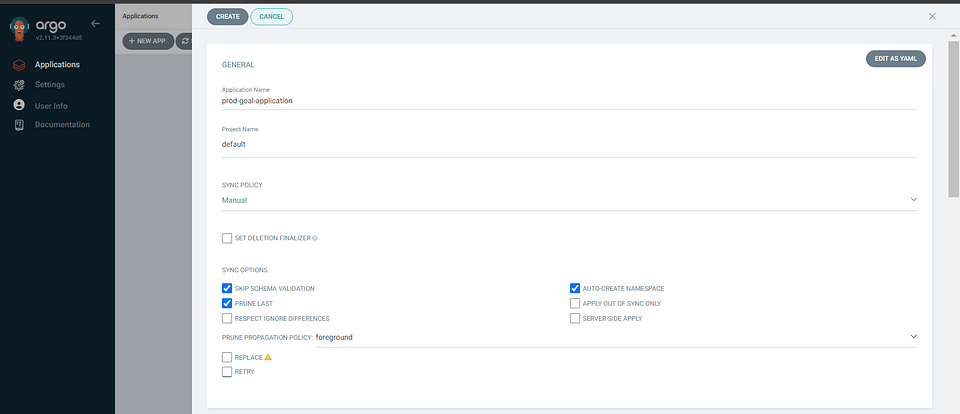
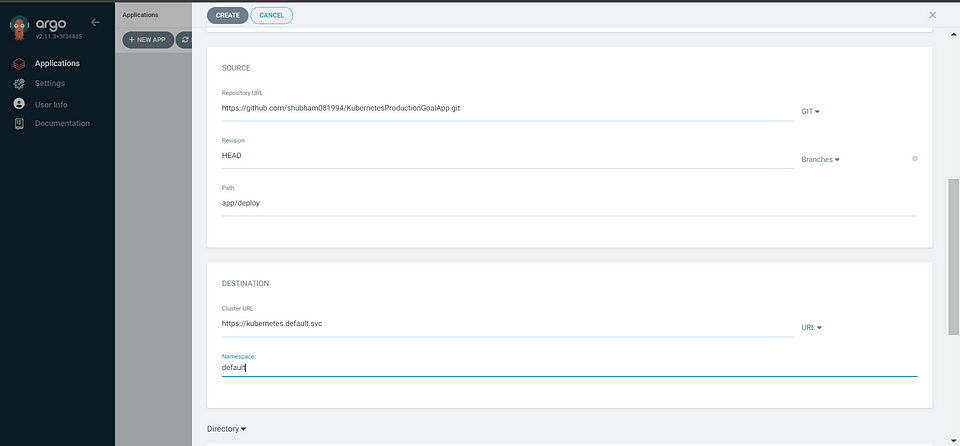
Create a new application in ArgoCD and integrate it with GitHub, you need to provide the following information:
Repo URL: Provide the link to your GitHub repository where the application’s source code is hosted.
Path: Specify the path to the deployment manifests within your repository. In this case, it is app/deploy
By providing these details, ArgoCD will be able to fetch the deployment manifests from the specified GitHub repository and deploy the application accordingly

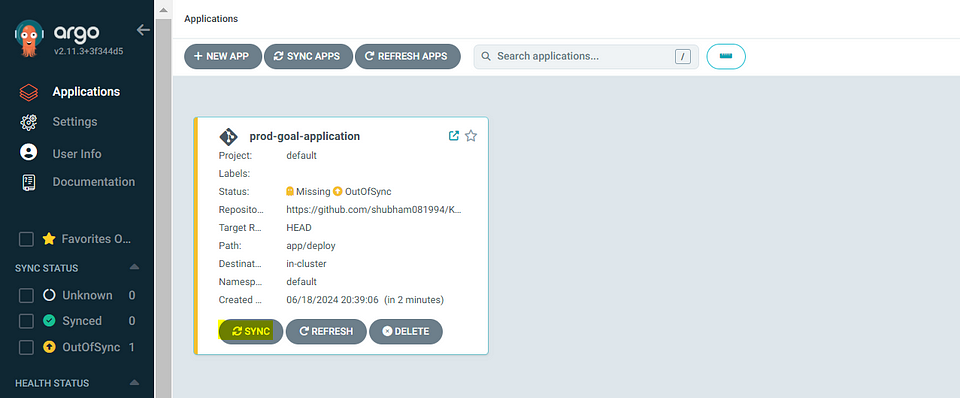
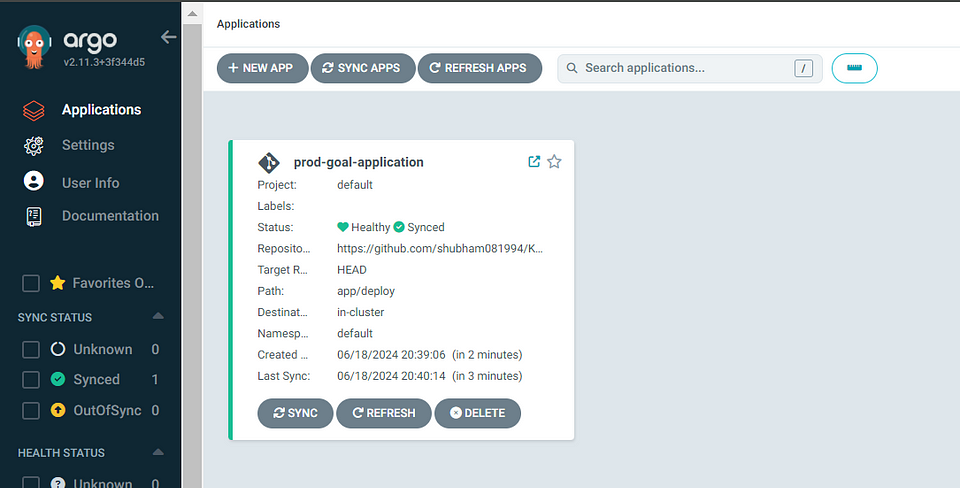
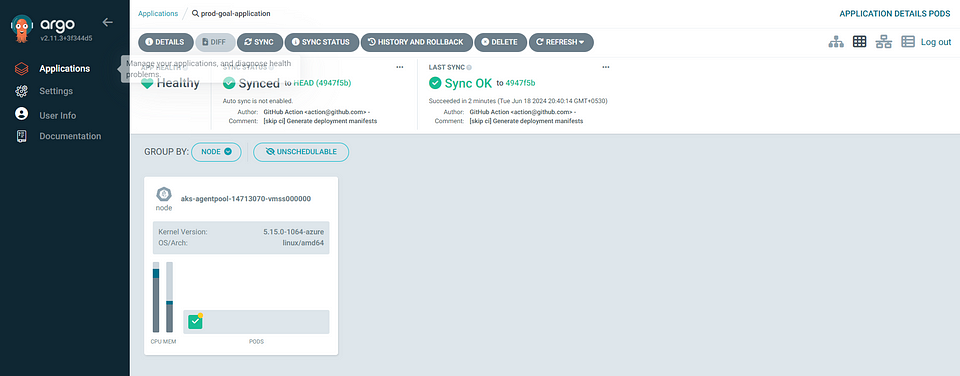
After clicking SYNC it will fetch GitHub deployment file inside the app/deploy/deploy.yaml after the deployment on AKS Cluster its will show
Status: Healthy & Synced
Enable Automatic Sync: Enable the automatic synchronization feature in ArgoCD. When a new image is pushed to the repository, ArgoCD will detect the change and initiate a deployment using the updated image.
Container Image Updates: Ensure that your CI/CD pipeline or build process updates the image tag or version in the deploy.yaml file.
Push Changes to Git: Whenever you want to deploy a new version of your application with an updated image, commit and push the changes. ArgoCD will detect the changes and automatically trigger the deployment using the latest image.
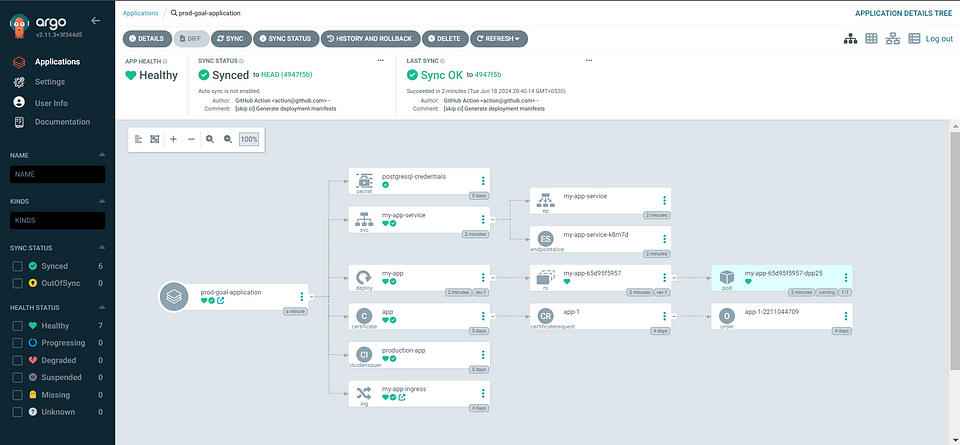


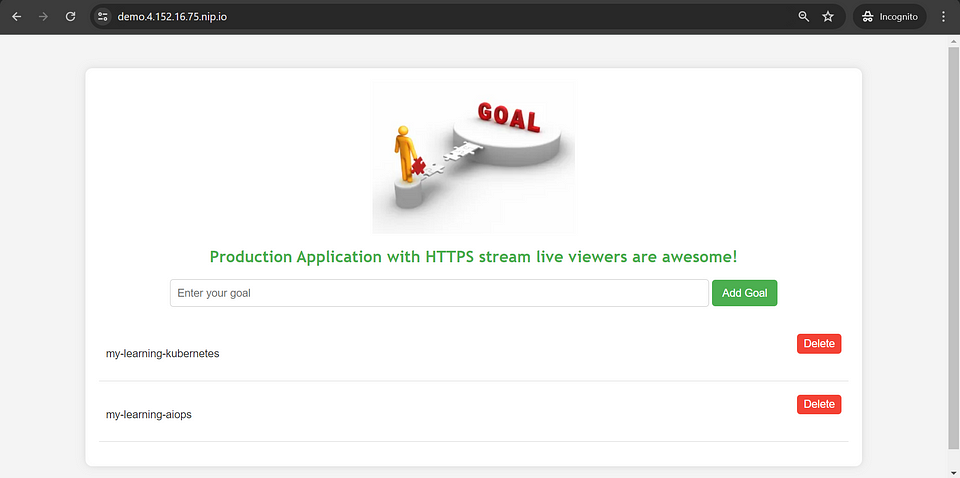
Visit the application link : demo.4.152.16.75.nip.io
Now you can add your goals & delete goals.
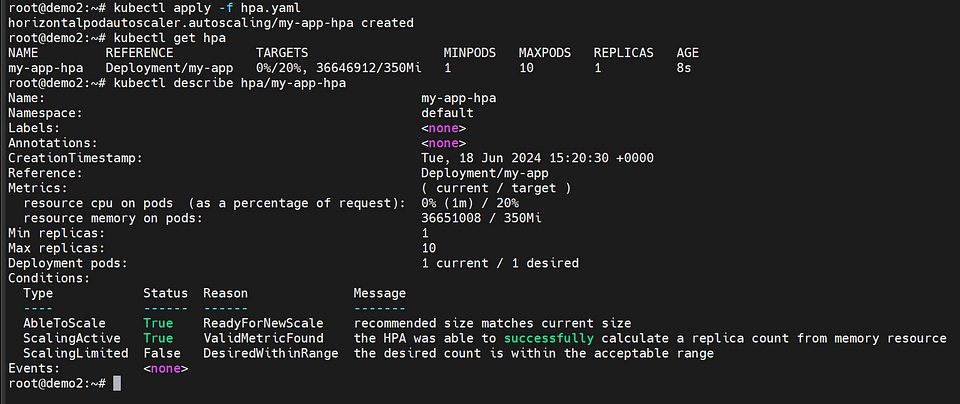
Horizontal Pod Autoscaling:
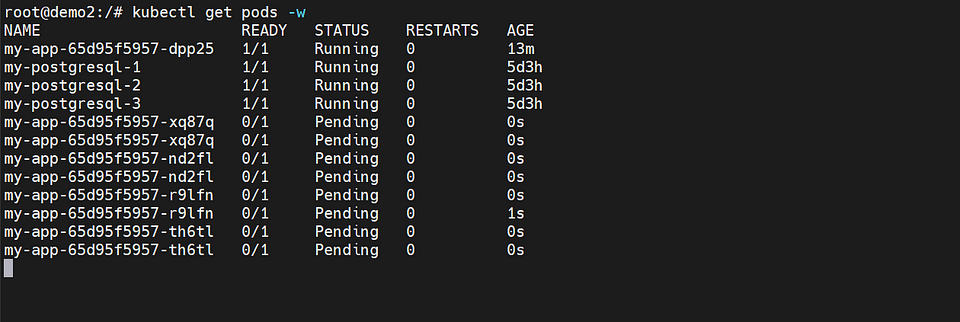
The Horizontal Pod Autoscaler (HPA) is a configuration that enables automatic scaling of the “my-app” deployment based on CPU and memory usage. The goal is to maintain a number of replicas between 1 and 10.
The HPA monitors the CPU and memory utilization of the pods and adjusts the number of replicas to ensure that the resource utilization targets are met. Specifically, it targets an average CPU utilization of 20% and an average memory utilization of 350Mi.
apiVersion: autoscaling/v2
kind: HorizontalPodAutoscaler
metadata:
  name: my-app-hpa
spec:
  scaleTargetRef:
    apiVersion: apps/v1
    kind: Deployment
    name: my-app
  minReplicas: 1
  maxReplicas: 10
  metrics:
  - type: Resource
    resource:
      name: cpu
      target:
        type: Utilization
        averageUtilization: 20
  - type: Resource
    resource:
      name: memory
      target:
        type: AverageValue
        averageValue: 350Mi
Testing the application by increasing the server load
To test the application and simulate increased server load, you can use Grafana k6, which is a user-friendly and extensible open-source tool for load testing.
Here are the steps to follow:
Install k6 CLI: Begin by installing the k6 command-line interface (CLI) on your system.
Create a load.js file: Create a file named “load.js” and replace your base url with paste the following content into it.
import http from "k6/http";
import { check } from "k6";
export const options = {
  vus: 100,
  duration: '30s',
};

const BASE_URL = 'http://demo.4.152.16.75.nip.io'

function demo() {
  const url = `${BASE_URL}`;

  let resp = http.get(url);
  check(resp, {
    'endpoint was successful': (resp) => {
      if (resp.status === 200) {
        console.log(`PASS! url`)
        return true
      } else {
        console.error(`FAIL! status-code: ${resp.status}`)
        return false
      }
    }
  });
}
export default function () {
    demo()
}
3. Run the load test: In your terminal or command prompt, run the following command to execute the load test using k6.
k6 run load.js
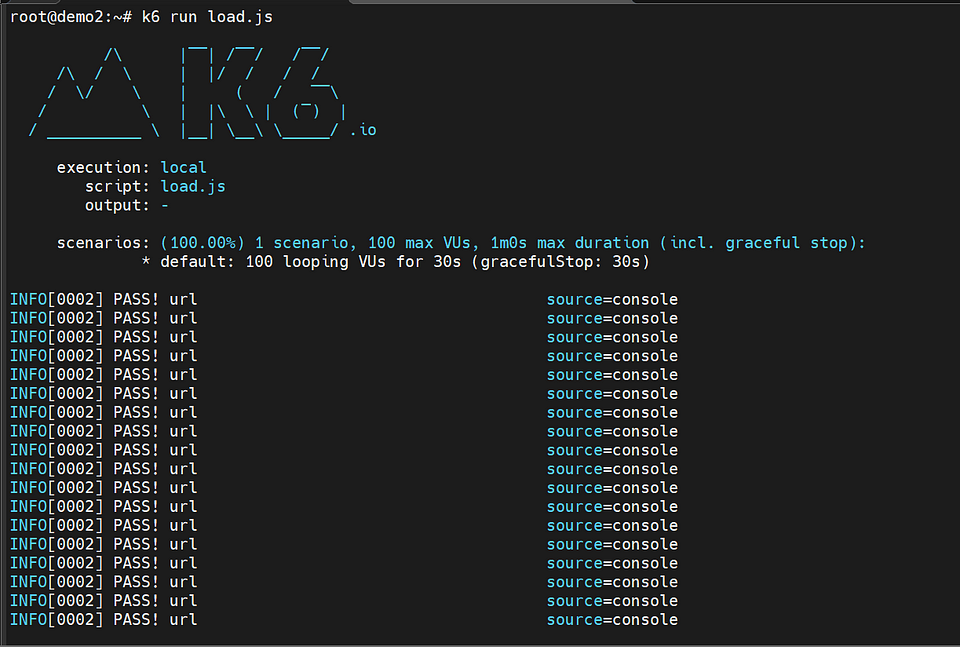
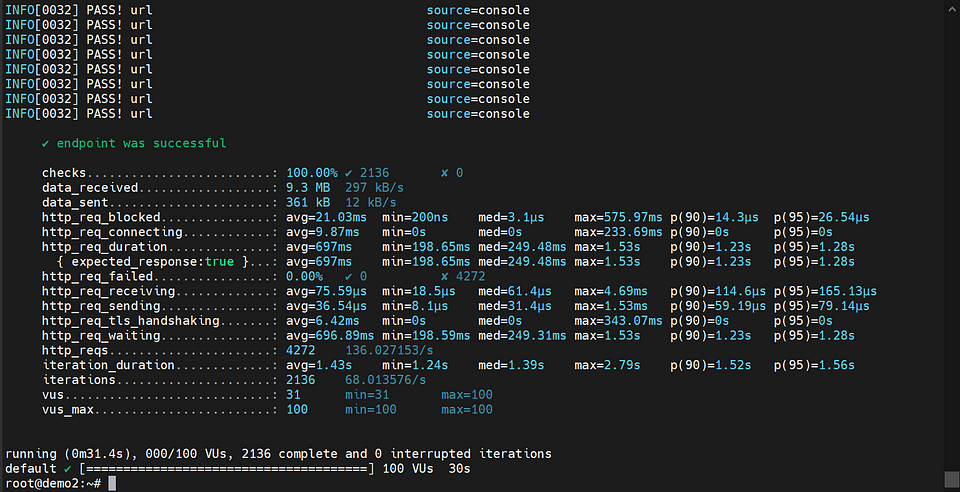
After conducting load testing using k6, the Horizontal Pod Autoscaler (HPA) will monitor the resource utilization of the pods. If the observed load exceeds the defined threshold, the HPA will automatically create additional pod replicas to handle the increased demand. This dynamic scaling ensures that the application can efficiently handle the growing workload and maintain optimal performance.


Why I used nipo.io?
The nip.io domain is a wildcard DNS service that allows you to access a specific IP address using a custom domain. It maps any subdomain to the corresponding IP address. For example, demo.4.152.16.75.nip.io will be resolved to the IP address 4.152.16.75.
This is commonly used in development or testing environments where you may not have a registered domain or DNS configuration.
GitHub repo:
https://github.com/shubham081994/KubernetesProductionGoalApp.git
Reference link:
https://cloudnative-pg.io/
https://cert-manager.io/docs/installation/
https://kubernetes.io/docs/tasks/run-application/horizontal-pod-autoscale/
https://k6.io/docs/get-started/installation/